Difference between revisions of "Floor plan"
From AMTech WikiDocs
| Line 1: | Line 1: | ||
The '''floor plan''' field appears in an instance when the corresponding thing type have the '''floor plan''' checked. It allows to associate a calibrated image to the resource, it means an image located inside an area in the [[spatial view|world map]]. These images will be shown whenever the corresponding thing is shown in the map but with small opacity. | The '''floor plan''' field appears in an instance when the corresponding thing type have the '''floor plan''' checked. It allows to associate a calibrated image to the resource, it means an image located inside an area in the [[spatial view|world map]]. These images will be shown whenever the corresponding thing is shown in the map but with small opacity. | ||
| − | + | * Click on small square at the left of the calibration button to select the image. | |
| − | [[File:floorplan_selected.png]] | + | :::[[File:floorplan_instance_empty.png]] |
| − | + | ::It will show the previous image if there was one | |
| − | [[File:floorplan_default_location.png]] | + | :::[[File:floorplan_selected.png]] |
| − | + | * Click on button to start calibration. The browser will scroll to show the map and propose a default location according to the current view box if there is not a previous location set | |
| − | [[File:floorplan_calibrated.png]] | + | :::[[File:floorplan_default_location.png|400px]] |
| − | The field will be updated each time you move a marker, however, do not forget to save the resource once you have chosen the correct area. | + | * Place the image in the map by moving the five square markers. Center one will move the selected region. Center marker will move the entire region while the other 4 will modify the vertices of the region. |
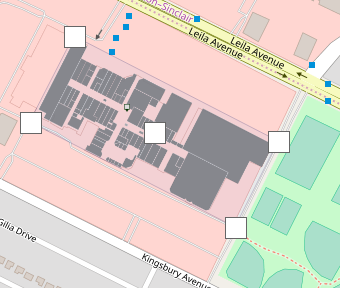
| − | + | :::[[File:floorplan_calibrated.png]] | |
| − | [[File:floorplan_map_state.png]] | + | ::The field will be updated each time you move a marker, however, do not forget to save the resource once you have chosen the correct area. |
| − | + | * In order to finish (or stop) the image calibration, click on the button at the right of the map state message (top left corner). | |
| + | :::[[File:floorplan_map_state.png]] | ||
| + | ::or click on the calibration button: | ||
| + | :::[[File:floorplan_calibrating.png]] | ||
| + | |||
{{Note|It is important to note that the '''floorplan''' location is independent to that of the resource, but you need to locate the resource before calibrating the image.}} | {{Note|It is important to note that the '''floorplan''' location is independent to that of the resource, but you need to locate the resource before calibrating the image.}} | ||
Latest revision as of 15:38, 21 December 2016
The floor plan field appears in an instance when the corresponding thing type have the floor plan checked. It allows to associate a calibrated image to the resource, it means an image located inside an area in the world map. These images will be shown whenever the corresponding thing is shown in the map but with small opacity.
- Click on small square at the left of the calibration button to select the image.
- Click on button to start calibration. The browser will scroll to show the map and propose a default location according to the current view box if there is not a previous location set
- Place the image in the map by moving the five square markers. Center one will move the selected region. Center marker will move the entire region while the other 4 will modify the vertices of the region.
- In order to finish (or stop) the image calibration, click on the button at the right of the map state message (top left corner).
Note: It is important to note that the floorplan location is independent to that of the resource, but you need to locate the resource before calibrating the image.


