Difference between revisions of "Configuring Wio Link/Node devices"
From AMTech WikiDocs
| (12 intermediate revisions by the same user not shown) | |||
| Line 3: | Line 3: | ||
In order to add your Wio Link/Node devices to the AMTech platform you need to grant a wireless communication between the M2MBridge and each Wio device. To fulfill this requirement you may follow one of these alternatives: | In order to add your Wio Link/Node devices to the AMTech platform you need to grant a wireless communication between the M2MBridge and each Wio device. To fulfill this requirement you may follow one of these alternatives: | ||
* Maintain the factory configuration of the default wireless interface, which is configured as a Wireless AP, and assure an Internet connection for the M2MBridge device through any other network interface or through the Digi Mesh. | * Maintain the factory configuration of the default wireless interface, which is configured as a Wireless AP, and assure an Internet connection for the M2MBridge device through any other network interface or through the Digi Mesh. | ||
| − | * Connect your M2MBridge to a wireless router that allows you to assign a static IP and then connect each Wio device to the same router. The static IP assigned to your M2MBridge will then be used as the custom server address for the Wio App. | + | * Connect your M2MBridge to a wireless router that allows you to assign a static IP address and then connect each Wio device to the same router. The static IP address assigned to your M2MBridge will then be used as the custom server address for the Wio App. |
To add your Wio Link/Node device to the AMTech IoT platform, you should follow these steps after the application has been installed in your phone: | To add your Wio Link/Node device to the AMTech IoT platform, you should follow these steps after the application has been installed in your phone: | ||
# Configure the network in your phone to connect to the the wireless network offered by the AMTech M2MBridge device or follow any other method that allows you to be in the same network where the M2MBridge is connected. You will need to be able to get to the M2MBridge through a direct IP connection. | # Configure the network in your phone to connect to the the wireless network offered by the AMTech M2MBridge device or follow any other method that allows you to be in the same network where the M2MBridge is connected. You will need to be able to get to the M2MBridge through a direct IP connection. | ||
# Open the Wio App and you will see a view like this one: | # Open the Wio App and you will see a view like this one: | ||
| − | [[File:wio-login.png|250px||thumbnail|center| | + | #: [[File:wio-login.png|250px||thumbnail|center|Initial view]] |
| + | # Click on "Global (new)" link to change to a custom server and type in the following address <code>http://172.20.10.1:8080</code> and click on "Save": | ||
| + | #: [[File:wio-customize-server.png|250px||thumbnail|center|Customize server]] | ||
| + | #: If you didn't keep the original configuration for the wireless network in the M2MBridge device then you will need to replace 172.20.10.1 for whatever other static address you configured it to have. | ||
| + | # Now type in the following email '''amtech@amtech.mx''' and password '''4mt3ch.''' to login to the server. If everything worked as expected, you will get the following view: | ||
| + | #: [[File:wio-logged.png|250px||thumbnail|center|Logged]] | ||
| + | # Click on "Add your first device" button and follow the wizard: | ||
| + | #* Select the type of Wio device that you're adding: Wio Link or Wio Node | ||
| + | #* Do the indicated procedure in your Wio device to change it to configuration mode. Click on next. | ||
| + | #*: [[File:wio-wizard2.png|250px||thumbnail|center|Wio add wizard]] | ||
| + | #* Configure the wireless network that your Wio device will connect to. The Wio should be able to reach the M2MBridge through this configuration. | ||
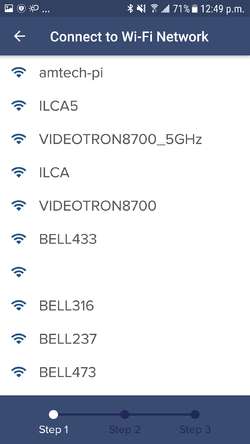
| + | #*: [[File:wio-wizard3.png|250px||thumbnail|center|Chose the wireless network for your Wio device]] | ||
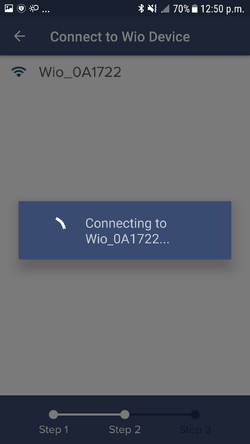
| + | #* Select the Wio device network (probably something starting with Wio_) and wait for the Wio device to be configured | ||
| + | #*: [[File:wio-wizard4.png|250px||thumbnail|center|Wio is configured]] | ||
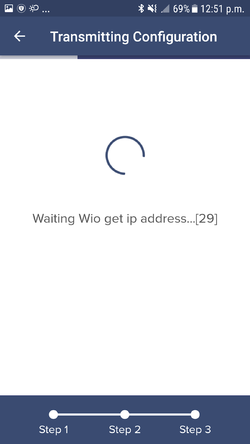
| + | #*: [[File:wio-wizard5.png|250px||thumbnail|center|Wio is configured]] | ||
| + | #* End up by typing a name for the Wio device. This name will be used later to configure this Wio device in the AMTech IoT Platform | ||
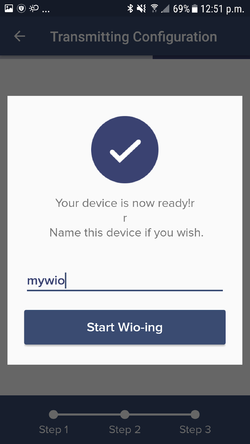
| + | #*: [[File:wio-wizard6.png|250px||thumbnail|center|Configure a name]] | ||
| + | # Once the device has been added, you will see it in the list of added devices and then you need to configure its ports. | ||
| + | #: [[File:wio-device-added.png|250px||thumbnail|center|Device has been added]] | ||
| + | # Tap the device to access its configuration and start dragging sensors to its ports resembling the same configured sensors that you have physically connect to your Wio device | ||
| + | #: [[File:wio-configure-ports.png|250px||thumbnail|center|Configure ports]] | ||
| + | # Click on update firmware | ||
| + | #: [[File:wio-updating firmware.png|250px||thumbnail|center|Updating firmware]] | ||
| + | # And that's it, that's all. You will end up with a configured Wio device | ||
| + | #: [[File:wio-list-device-and-sensor-added.png|250px||thumbnail|center|Device has sensor has been added]] | ||
Latest revision as of 15:58, 7 August 2018
To configure a Wio Link or Wio Node you should use the Android/iOS app that is available in the app store. You can find more information in this page.
In order to add your Wio Link/Node devices to the AMTech platform you need to grant a wireless communication between the M2MBridge and each Wio device. To fulfill this requirement you may follow one of these alternatives:
- Maintain the factory configuration of the default wireless interface, which is configured as a Wireless AP, and assure an Internet connection for the M2MBridge device through any other network interface or through the Digi Mesh.
- Connect your M2MBridge to a wireless router that allows you to assign a static IP address and then connect each Wio device to the same router. The static IP address assigned to your M2MBridge will then be used as the custom server address for the Wio App.
To add your Wio Link/Node device to the AMTech IoT platform, you should follow these steps after the application has been installed in your phone:
- Configure the network in your phone to connect to the the wireless network offered by the AMTech M2MBridge device or follow any other method that allows you to be in the same network where the M2MBridge is connected. You will need to be able to get to the M2MBridge through a direct IP connection.
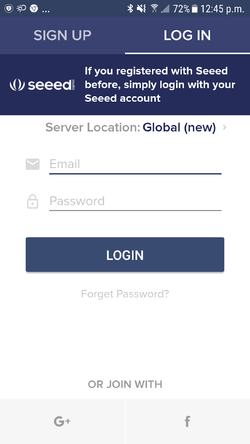
- Open the Wio App and you will see a view like this one:
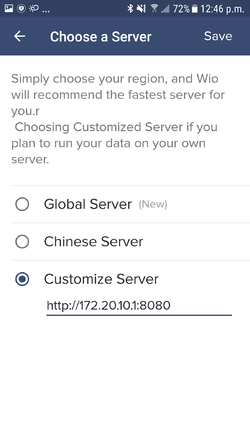
- Click on "Global (new)" link to change to a custom server and type in the following address
http://172.20.10.1:8080and click on "Save":- If you didn't keep the original configuration for the wireless network in the M2MBridge device then you will need to replace 172.20.10.1 for whatever other static address you configured it to have.
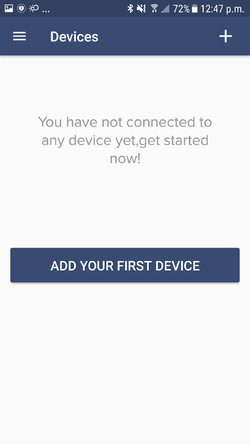
- Now type in the following email amtech@amtech.mx and password 4mt3ch. to login to the server. If everything worked as expected, you will get the following view:
- Click on "Add your first device" button and follow the wizard:
- Select the type of Wio device that you're adding: Wio Link or Wio Node
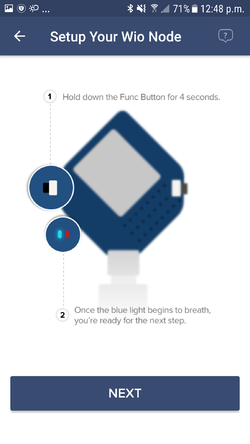
- Do the indicated procedure in your Wio device to change it to configuration mode. Click on next.
- Configure the wireless network that your Wio device will connect to. The Wio should be able to reach the M2MBridge through this configuration.
- Select the Wio device network (probably something starting with Wio_) and wait for the Wio device to be configured
- End up by typing a name for the Wio device. This name will be used later to configure this Wio device in the AMTech IoT Platform
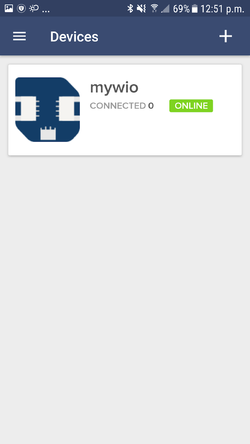
- Once the device has been added, you will see it in the list of added devices and then you need to configure its ports.
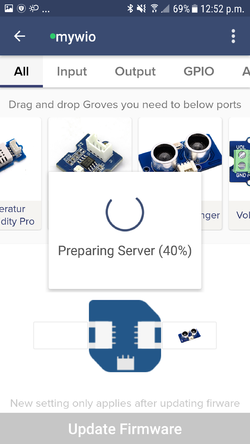
- Tap the device to access its configuration and start dragging sensors to its ports resembling the same configured sensors that you have physically connect to your Wio device
- Click on update firmware
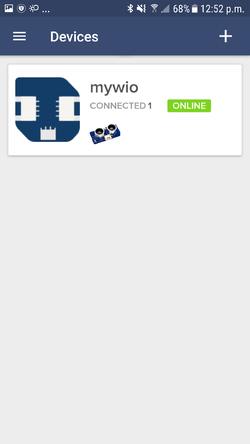
- And that's it, that's all. You will end up with a configured Wio device
